Filters are useful. Or useless. It just depends upon what you're using them for.
Don't believe me about how protective filters can alter flare and produce imaging issues? Check out this article that reviewed 17 different filters and came to the conclusion that they all increased flare tendencies. (I'll save you the translation needed from the Japanese: "Even with [the most expensive filter in the test] it's impossible to keep backlight ghosts to zero."

There are actually two filters used in this image, made in Botswana at the same watering hole as featured on the cover of Frans Lantings' book, Okavango: Africa's Last Eden. Because I wanted to silhouette the elephants, I flipped a graduated neutral density filter and used a sliver of its filtration to remove any detail in the foreground, and I used a Cokin Orange filter to keep the yellow in the sky (I was using Kodachrome 200, which I knew wouldn't hold that color well). Nikon N90s, 17mm, taken from ground level. (The funny thing is that my picture is orange while Lantings' picture is pink—two very different approaches.)
Now that many of us are using a digital camera, one question I get even more often than before is: what filters should I use? But that's a question that all photographers should ask themselves. This article will try to give you some of my views on filters and their correct use.
In general, filters can be used to:
- Increase or decrease contrast
- Change colors or color balance
- Change exposure (partially or fully)
- Add a visual effect
In each of these cases, you're making a change to the scene as it exists in front of you and the way that film or your CCD will record it. That's okay. Good photography is all about making the decisions about what you do and don't want to show an eventual viewer. So, for filter use...
Thom's Maxim #18: Know what you want to change and why.
This seems like an obvious statement, but I'm consistently surprised by how many photographers, especially amateurs, never follow it. At workshops, for example, I've seen students watch me pull out a filter, then attempt to mimic me by pulling out the same (or similar) filter themselves. That's a recipe for disaster. Why? Because unless you know why I pulled that filter out and what I'm trying to achieve with it, you're simply making a random change. You should only be making changes (e.g., lens, filter, composition, exposure choices) you want to make.
For example, consider the picture at the top of this page. I had just gotten my first graduated neutral density (ND) filters, and the late Galen Rowell had showed me how he used them only a few days before. If you had seen me pull out my graduated neutral density filter, you might have assumed that I was using it to hold back the sky exposure, their typical use. Galen happened to be the only other photographer on the ground with me that evening, and he was perplexed enough by my physical location, my camera angle, and the filter I had just pulled out to ask me why I thought I needed the ND (he wasn't using one). When I told what I was going to do with it, he smiled and said "okay, I was thinking maybe you hadn't been listening to me."
So, even before we get to what each filter does and why you might want to use it, remember that you have to a particular reason to use a filter. There's another reason for this:
Thom's Maxim #19: Don't put extra glass or plastic in front of your expensive, well designed glass unless you need to.
There's a tendency amongst amateur photographers to put UV or Skylight filters on the front of every lens they own. This tendency is encouraged by photo dealers, who, as they ring up your expensive new toy add "and you want a skylight filter to protect that lens, right?"
The reason the dealer asks this is simple: it's a way to increase their profit. Mail order outfits such as Amazon, B&H, and Adorama have made it difficult for local dealers to charge list price on lenses (though some still manage). For example, the markup on a 24-85mm AF-S lens is quite small, meaning that the dealer might make only $50 on your purchase. The markup on a $30 filter can be as high as 80%. By selling you that filter, the dealer can make another $24 on the sale, increasing his profit by 50%.
So the question is: do you need that filter?
First, let's examine why a UV or Skylight filter is usually suggested: it won't change colors, nor does it lower the amount of light that passes through to the film/sensor significantly. While most are made of multicoated glass, the two extra air/glass surfaces will have a slight impact on overall contrast due to refraction. Some dealers will tell you that you need these filters to get proper color at altitude, or in bright conditions, or some other nonsense. But the truth is that film hasn't needed UV filtration for quite some time now—all modern film stocks have virtually no UV sensitivity. Meanwhile, digital cameras all have UVIR filtration over their sensor, effectively doing what the UV or Skylight filter would have done. You don't need to do that twice.
So what have you gained by putting a filter in front of your lens? Well, the other normally suggested reason is "to protect the front element of your lens from accidental scratching or breakage."
I suppose. Small scratches on the front element of most lenses don't actually have much effect on optical performance, though. Indeed, unless the lens is a very wide angle lens, about the only optical effect a small scratch would have is exactly the same one as a filter has: lower contrast. (On wide angle lenses at really small apertures, depth of field might be large enough so that you'd see optical degradation due to a scratch or blemish.) And if you're going to bump the lens hard enough to create more than a minor scratch, you're probably hitting it hard enough to bust a filter, and broken glass scratches the next layer of glass pretty darn well in such situations, so I don't hold much faith in the "protection from breakage" theory.
In short, I don't see much of a reason to put a filter on my lens for protection. Indeed, I've found that lens hoods tend to do a better job at that, anyway, as it keeps you from bumping the lens against close objects.
But note what I implied earlier in this discussion: adding a filter to your lens degrades optical performance. A really well made filter won't degrade performance noticeably, but it will degrade. Poorly made or inexpensive filters degrade performance more than well made ones. Every air/glass (or air/plastic) transition in a lens adds reflections, despite multi-coatings and quality materials. Every reflection decreases overall contrast. Some reflections can be insidious in this respect, especially if light is hitting the front filter surface unevenly.
And this previous paragraph leads us to yet another conclusion:
Thom's Maxim #20: Good filters are expensive.
I'm always amused when a student pulls out $10 plastic filters and sticks these on the front of their $1400+ lenses. What's the expectation here? Unless it's some cartoon-like effect, this is an almost certain way to lower the quality of image that your camera can capture.
The reason why good lenses are expensive is that it is not easy to grind glass in ways that are defect free, and it takes multiple, well-researched coatings (and expensive glass) to keep colors neutral and focused at the same spot. You could take a piece of window pane glass and spray something on it and have a filter. But window pane glass doesn't have a perfectly even thickness, and what you spray as a coating needs to have known properties for how it passes light.
The most obvious of these cheap, cartoon-like filters were the old resin Cokin P graduated filters. Cokin made them in Tobacco, Smoke, and supposedly Neutral variations, as well as a bunch of more bizarre renditions, such as Blue, Orange, and even Yellow. The name "Tobacco" ought to be a giveaway. Exactly what color is that? (That filter provides a garish, warm tint in the filtered area). But the Neutral version wasn't neutral. And the Blue version didn't just effect blue tones. And so on. I once used these filters for startling effects, but never if I was trying for the highest quality and color neutral results.
But I've seen more expensive, supposedly high quality filters that have problems, too. In general, I've moved away from Hoya and Tiffen filters and these days tend to use B&W filters, which seem more consistent in quality and less prone to unwanted optical "additions." But ask around: dedicated photographers learn to perceive the differences between a "quality" filter and one that adds unwanted side effects.
What Do Filters Do?
So let's look at some filters, what they do, and why we might want to use them (warning: some of what follows may contradict what you think you know):
- "Warming" filters. Actually, this category name is a misnomer. An 81A filter is often referred to as a "warming" filter, but what we're really talking about are color correction filters. Film is produced to have a response to a certain color temperature of light (and digital cameras have a white balance setting to control the same thing). Indoor film is usually balanced to 3400K and outdoor film is balanced from 5400 to 5600K, depending upon the type and manufacturer. What the heck are those numbers, you ask? Well, they're color temperatures of the light measured in Kelvin (K). Continuous spectrum light produces a balance of the visual range of colors somewhat dependent upon the black body heat level. Huh? Well, think of it this way: when you turn the gas burner on your stove on at a low level, the flame is "orange." As you raise the heat, the flame eventually becomes "blue." That's the black body heat level in action: the hotter something burns, the more blue the light (higher K value). (Note, things like our atmosphere have a tendency to modify the light value of distant "hot" objects, like the sun.) "Warming" filters weren't originally produced to provide redder renditions of your scenes; they were produced to correct certain lighting conditions to match what film (and today, certain digital white balances) were set for. For example, that 81A filter that everyone uses for "warming," provides a MIRED (MicroREciprocal Degree, a way of measuring color temp--see pages 42-43 of Nikon Field Guide) shift of +18. Used in sunny daylight, an 81A would make film respond more as if it had a color temperature setting of 5000K, rather than 5500K. When you mismatch what actually passes to the film/CCD (5000K) with what the film/CCD expects (5500K), you get a color shift. Lower than expected values like this example produce warmer (redder) coloration. In the "warming" family, the lineup, from least to most effect is 81, 81A, 86C, 81B, 81C, 81D, 81EF, 86B, 85C, 86A, 85, and 85B. But there are also "cooling" filters, which have the opposite effect (passing a higher color value to the film/CCD than expected). From weakest to strongest, these would be 82, 82A, 78C, 82B, 82C, 80D, 78B, 80C, 78A, 80B, 80A. Those of you who've read the white balance sections in any of my Complete Guide books will probably understand what I'm about to write: unless you know what your film/sensor is set to record and the current color temperature of the light you're shooting under, you cannot possibly know what filter to add to your lens to get the exact warming effect you want. Even worse, if you use print film, most automatic printing machines will try to remove any color shift the warming filter adds! There are photographers who regularly use a particular warming filter on their lenses for every condition; what they are essentially doing is shifting the color temperature balance of the film they're using, not warming a particular scene. In digital with a camera that has decent white balance adjustment abilities (D100, D1 series are examples), I'll make a blanket proclamation: there is no reason to use a warming filter; learn how to use white balance properly instead.
- Pros: inexpensive; modify colors in known ways
- Cons: do you know why and how you're modifying color?; really need a wide variety to fine tune color adjustment; modern Nikon's have "warming" abilities built into the white balance choices
- Polarizer. A polarizing filter alters a key property of light. "Pure" light consists of light photons in a nice, standardized "wave." But whenever light bounces off of an object (the thing you're photographing!), side components are added to this wave and it is no longer quite as well formed. What a polarizer does is strip off some (many) of these side components. A practical example: you're photographing pointed down into a body of water. What you normally see (and photograph) are reflections on the surface of water, and those reflections are really formed by the side components. Put a polarizer on and adjust it correctly (see sidebar, at right), and you can often remove most, if not all, of these reflections. But the same is true of just about anything: if I'm photographing foliage, for example, I'll often use a polarizer for the same reason I do when photographing water: to remove the random reflections that reduce the apparent contrast on the surface of the leaf (water).
- Pros: give you control over reflections; tend to increase contrast and color saturation; can be used to darken bright skies
- Cons: relatively expensive for a good filter that won't vignette on wider lenses; polarization effect will vary across scene with wide angle lenses; some multi-part polarizers are prone to fogging; effect can't always be maximized
- Neutral Density. A standard ND filter simply blocks some amount of light from getting to the lens. You can easily find ND filters in 1 stop, 2 stop, 4 stop, and even 8 stop values. A good ND filter is color neutral, meaning that it blocks all values of light equally. Singh-Ray now has a variable effect ND filter (from 1.5 to 10 stops) which keeps you from having to carry multiple ones, but it is expensive (US$350). Some uses of ND filters include:
- Obtaining flash sync speeds. In bright light with cameras that have slow flash sync speeds, you might not be able to use flash without an ND filter, because you can't set an aperture/shutter speed combination that falls within that allowed by the camera. For example, the Fuji S1 had an ISO of 320 and a flash sync speed of 1/90. By definition, Sunny 16 exposure would be f/16 at 1/320, so how would you manage to use fill flash outdoors? (1/320 is almost 2 stops from 1/90, so you'd need a lens that went to f/28 to get to 1/90.) Well, one answer would be to put a 2-stop ND filter on the camera, which would drop your shutter speed to a level where you could use flash.
- Obtaining a slow shutter speed. I like playing with slow shutter speeds and moving objects. But sometimes there's more light in the scene than I need, so I put an ND filter on. For example, it usually takes a shutter speed in the range of 1/15 to show motion on someone walking, so if I were outside with a D100 (ISO 200) in Sunny 16 conditions, by definition I'd need something near f/64! But if I put an 4stop ND filter on the front of the lens, I could achieve something near f/11 at 1/15, which is manageable.
- Pros: inexpensive; provide additional shutter speed/aperture selection flexibility
- Cons: none other than the obvious one that they let less light through to the film/sensor.
- Graduated Neutral Density. A graduated ND filter has a portion of the filter that's "clear" and another portion that blocks some amount of light. The idea behind these filters is that in some outdoor scenes you may encounter lighting situations that exceed the range your film or sensor can capture at once. The typical scenario is bright sky and/or background with a foreground in shadow. While estimates of dynamic range capabilities of film and sensors vary (partly due to different tolerances for noise, non-linearity, and artifacts), I usually say that slide film has 5-6 stops of dynamic range, Nikon sensors typically have 7 to 10 usable stops of dynamic range, and print film tends to have 8-9 stops of dynamic range. Yet I frequently encounter outdoor scenes that have 12 or more stops of difference between bright detail and dark detail. By using a graduated neutral density filter, I can hold back the brightest areas in a scene, essentially reducing the overall range of brightness in the scene. To do so, unfortunately, means that I need a clear, mostly straight, edge of demarcation between the dark and bright areas, though. That edge is not always possible to find, though once you get the knack of what to look for, you'll find it more often than you'd think. Most graduated NDs come in what are called "soft" and "hard" variants. These variations describe the transition area from filtered to non-filtered, with soft transitions being longer and less abrupt than hard transitions. If you have a strong, high contrast boundary, such as a horizon with a bright sky, you'd use a hard edge graduated ND. If you have a boundary that's less straight or has intermediary values that would make hiding the transition edge of the filter difficult, you use a soft edge. Graduated NDs come in a variety of strengths. The late Galen Rowell, who designed the commonly used Singh-Ray variety, usually recommended that newcomers to graduated NDs purchase a 2-stop soft and 3-stop hard as a starting point. (By way of comparison, I have 1-stop, 2-stop, 3-stop, and 5-stop soft and hard. What I carry with me varies a bit depending upon what I expect to encounter.) A couple of points are missed by many encountering graduated NDs for the first time: Screw-in versions are useless. The screw-in graduated ND always puts the transition area dead center in the frame, which is exactly where you're least likely to put the horizon or other dark/light transition. And you can't move that position. Avoid these filters at all costs. They aren't flexible enough to be useful.
- You don't always have to use them on level horizons. I find all kinds of ways of using graduated NDs. I've used them upside down (see example, top of page), sideways, very close to frame boundaries, on strong diagonals, and much more. The only thing you need is a distinct edge between bright and dark.
- They're not easy to position. The transition edge usually has to be placed perfectly in order to not be visible in the final shot. But seeing where the edge is positioned in the viewfinder can be difficult, at best. The secret is to use f/22 and hold the depth of field preview button in when you're positioning them.
- Telephotos don't work well with graduated NDs. Graduated NDs work decently with wide angle lenses because the depth of field still keeps the transition area relatively distinct (more so at small apertures than at wide apertures, obviously). With a 200mm lens, though, even the hardest edged filter transition becomes amazingly soft due to depth of field blur.
- You need front elements that don't rotate. Much like polarizers, it's a lot easier to set these filters if you aren't fighting the front element of the lens as it turns for focus. Use graduated NDs on lenses that have internal focus mechanisms and which don't rotate the front element.
- Pros: help manage scenes with wide exposure range; available in a wide range of strengths and transitions
- Cons: expensive; Singh-Ray's scratch easily; need distinct light/dark edge to position them on; generally prohibit use of lens hoods; can be difficult to position
- Enhancing filters. Every fall you'll see articles in the photography magazines (and now Web sites) about using enhancing filters to "bring out" the colors of fall foliage. Most of these filters are designed to over emphasize one color over another, such as red. While a lot of photographers think of these filters as something that "makes everything red redder," it's not that simple. Every one I've seen will change white objects from white to a slight color cast. In other words, yes, reds get redder, but all other colors will shift a bit, too, just not as much as the reds. The Singh-Ray enhancers probably do the best job of avoiding this color shift, but even they won't keep your whites from taking on a color cast. Thus, you'd better want the exaggerated color shifts these filters produce. Yes, they'll emphasize the yellows and reds in the fall leaves, but if you want to keep the trunks of those birch trees the proper white, you'll probably be disappointed. Personally, I'd tend to use digital editing techniques to pull out colors these days. You have more control and can do so only on selected colors or areas.
- Pros: help you saturate a specific color; give images a "zing" they might not otherwise have
- Cons: very expensive; other colors may shift, as well; effect can look unnatural in some scenes
- FLD or FLW. Fluorescent light is a pain to deal with. Not only do the individual phosphors decay at different rates, but not all colors of light are present. The net effect is usually that blue-green light tends to dominate and red-yellow light is present in lower-than-expected amounts. The traditional method of dealing with "balancing" fluorescent light--besides using a shutter speed that's a derivative of the AC cycle, such as 1/60 here in the US—is to use a Magenta filter on the lens. A better solution is an FLD (daylight tube) or FLW (warm tube) filter. These filters are better matched to what most fluorescent tubes produce than you'd get from simply pulling out magenta. (Curiously, they also seem to work well to fix casts on some glass tints, such as those in cabin glass of Cessna planes.) That said, I'd only use these on film cameras, as with digital cameras you're almost always better off shooting a custom white balance setting.
- Pros: inexpensive; do a better job than other commonly available filters
- Cons: don't always exactly match what bulb produces; don't fix the fact that not all colors of light are produced by bulb
I deal with infrared filtration elsewhere on the site, and I generally frown on the so-called special effects filters (fog, starburst, rainbow, etc.), as they produce cliché, amateur-looking effects. Thus, what I've just described are the types of filters you'd tend to find me carrying in my bag.
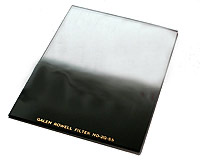
A typical graduated neutral density filter in Cokin P size. Note that the filter is longer than it is wide. This is to allow you to position the transition line between the filtered and non-filtered portions at almost any point in the image. I've exaggerated the filter a bit here—it's not that dark.
My Usual Filter Kit
- Cokin P, Lee, or Nisi holders. One of my Cokin holders was modified to a single slot. 52mm, 58mm, 62mm, 72mm, and 77mm mounting rings.
- Polarizers. 62mm and 77mm Circular polarizers from Nikon and B&W. 77mm Red/Blue polarizer from Singh-Ray.
- ND filters. 2 stop and 4 stop neutral density filters.
- Graduated ND. Singh-Ray graduated neutral density filters: 2 stop soft and 3 stop hard minimum kit. Sometimes I'll also carry a 1 stop soft, 2 stop hard, 3 stop soft and 5 stop hard.
- Sometimes: FLD filter for fluorescent lighting.
- Sometimes: Infrared filter for special effects.
- Sometimes: Step-up rings for lenses I'm carrying with my nonstandard filter sizes (e.g., 52->62, 67->77).
A Good Filter is:
- Color neutral (unless it is specifically designed to alter a color and that's the effect you want).
- Made of high quality glass or resin.
- Is often multicoated to preserve contrast.
- Not inexpensive.
- Comes with a protective case.
Do I Need to Buy Nikon Filters?
Nikon makes a number of filters, most notably a very nice set of circular polarizers. Yes, they're expensive, but they're also very high quality. On the flip side, some photographers don't like the wider front on the Nikon polarizers (made this way to reduce the chance of vignetting), which makes it difficult to mount additional filters in front of the polarizer.
But to answer the question the heading asks: no, you don't need to buy Nikon filters just because you have Nikon equipment.
How Do You Carry Filters?
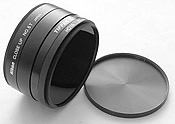
Good filters come with protective cases, but if you carry a wide variety of filters, these cases can add up quickly and give you more things to track. Some photographers use "filter wallets," which hold multiple filters in a single fold-out case. Personally, I've found that wallets aren't very protective of my expensive filters--the slide-in, slide-out process tends to scratch them. The solution I use for screw-in filters is "end caps." I screw all the filters together into a densepack and then screw end caps on each end. This puts all my filters into one spot and keeps them protected, even when I just sling the densepack into one of my pockets. (see photo, below)
With my Singh-Ray graduated neutral density filters, I simply use the supplied slip-in cases. But note that you'll eventually get grit into those cases that's difficult (if not impossible) to remove, and your expensive resin filters will ultimately develop scratches. Personally, I simply replace my Singh-Rays every 18 months or so, but you also have to remember that I travel in very harsh environments and subject my equipment to the elements all the time. You should get a longer life out of your Singh-Rays than I do.
Why Do You Need a Circular Polarizer?
Most autofocus cameras all require what's known as a "circular polarizer." I could get technical and describe "wave plates" and other technical mumbo jumbo to describe exactly what happens to light as it goes through a polarizer and how a circular polarizer is different from a linear polarizer, but let's simply cut to the chase: Nikon's autofocus system, for instance, uses a partial mirror surface. Linear polarizers produce a light that doesn't survive the partial mirror bounce down into the autofocus sensors well. Remember that the autofocus sensors on modern Nikon cameras also contain parts of the matrix and spot metering systems. Thus, if you don't use a circular polarizer, in some lighting conditions you can get slower or incorrect focus and incorrect exposure settings. So, if you own an autofocus Nikon DSLR body, only use circular polarizers. If you are using an older manual focus body, most will allow you to use the less expensive, regular (linear) polarizer.
Polarizer Effects
There are two primary effects you use a polarizer for: (1) to remove light scatter; and (2) to remove reflections. When you use a polarizer to make a blue sky darker or to get increased contrast or color saturation, you're removing light scatter. This effect works best when you are pointing the camera (and thus the polarizer) at a 90 degree angle to the original light source. Thus, if the sun is in the East sky, you'll get the darkest blue out of the polarizer when the camera is facing North or South. (But watch out for wide angle lenses! Many show enough angle of view that you can see the variability in the polarization effect across the frame.) The least effect occurs when you are point the camera at a 0 or 180 degree angle to the light source.
To remove reflections (off glass, water, etc.), the maximum effect occurs when you hold the camera 35 degrees to the surface containing the reflection.
Standardize on Sizes
Nikkor lenses used to have one of five filter sizes: 52mm, 62mm, 67mm, 72mm, or 77mm. These days, we've seen some others, including 82mm and 112mm! As a broad generalization of the older Nikkor philosophy: physically small prime lenses tended to use 52mm, larger prime lenses tended to use 62mm, consumer zooms tended to be 67mm or 72mm, and the professional zooms tended to use 77mm.
Instead of buying filters for every individual lens you own, Nikkor users can generally get by with buying two sets: 67mm and 77mm. Buy step-up rings (52mm-67mm, 62mm-67mm, 72mm-77mm) for the lenses you own that don't match these two sizes. Likewise, get a Cokin P ring (or dedicated filter holder) for each lens size you own, plus a couple of Cokin P holders. This allows you to use graduated NDs.