Are those spots you're seeing before your eyes,
or have the dreaded dust bunnies inhabited your camera?
My legal counsel wants me to run even longer legal disclaimers than Nikon, but I’ll keep it simple: when you work on your own camera, you do so at your own risk. I try to provide accurate, useful information that reflects the way I work, but I can’t be held liable for what you do with that information. Use the procedures listed here at your own risk.
This article applies to all Nikon-based digital SLR bodies. It probably also applies to other DSLRs and mirrorless cameras, as well, but since I don't generally test cleaning methods on them use this information on other cameras at your own risk. I will note that those of you with sensor-based IS systems (many mirrorless systems) need to be very careful when doing direct cleaning of the sensor.
A version of this page was first put up on the original bythom.com site soon after the D1 came out (1999) when professionals started coming to me asking what those black spots they kept seeing in their images were.
Because Nikon essentially punted on cleaning ("don't touch your sensor"), I wrote the original version of this page mocking Nikon with my famous Wendy's Knife cleaning trick. While my tongue was heavily in cheek with that version of the article, the technique I described worked. Indeed, using a lint-free pad wrapped around a modified Wendy’s plastic knife worked better than any other solution on the market at the time and was immediately copied without attribution by others, including becoming the foundation of at least one commercial product!
But a lot has changed over the two decades that we've all been shooting Nikon DSLRs. And today things are even more complicated than ever before (and Nikon still tries to claim in the US that you can't clean your sensor by touch despite selling products that show you how to do just that in Japan).
With the introduction of the D300 (and most subsequent Nikon cameras, as well as most Canon cameras), we have yet another variant in cleaning: a camera that purportedly cleans itself. The self-cleaning feature—SETUP menu: Clean Image Sensor—does a reasonable job at keeping casual dust off the sensor, but you'll still have to clean your sensor by hand at some point. Moreover, all of the sensors Nikon uses have a special tin oxide coating, which some claimed could be removed by using the wrong products or techniques, later disclaimed.
With all the changes that have occurred over the years, I've revised this page for about the twenty-second time. Please read the entire article, even though the basics are all boiled down into five simple steps in the middle.
And away we go...
It happens to all of us: eventually you'll find an image that, on close inspection, seems to have gotten the freckles (see example, below). No, you don't have bad photosites on your sensor, you probably have dust on the filter that sits over the sensor.
Don't go trying to eyeball the dust on your sensor filter, though (I'll have more to say on that later in the article now that items like the Sensor Scope are available). Most small spots that show up on your lens are not really visible to the naked eye (the largest Nikon photosite is less than 10 microns in size, and several hundred of those could fit on this em dash: —.
Or put another way: if you made your 36mp D800 or D810 sensor as big as a football field (100 yards long) each individual photosite would be about a half inch square in size. You're just not going to see an individual dust particle that impacts one or a few pixels with your bare eye (though you may see bigger things, like hairs, pollens, and maybe lubricant splatter). Simply put, it doesn't take a giant glob of dirt to make your camera exhibit the dreaded spots at the pixel level. Itsy bitsy and invisible dust particles can be just as annoying as something you can see with your bare eyes.
What's Dust Look Like?
I was testing out a lens in Utah and thought the delicate clouds and fall foliage would give me plenty of detail to look at (they did). But the sky held a lot of strange dark spots. Sometimes those can just be distant birds that don’t resolve to more than a pixel or two, but in this case, there weren’t any birds in the sky:
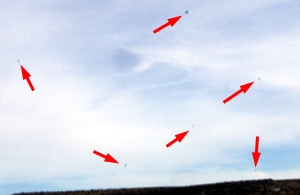
I've brightened and enlarged the very middle of the shot. Now you can see the dreaded dust bunnies that had managed to sneak into my camera during a two-week Utah sojourn. I counted 63 such spots in the sky area alone, so I probably had well over a 100 little imperfections waiting to mess up my shots. Of course, the healing brush in Photoshop makes fast work of these annoyances, but still, who wants to spend all their time post-processing photos to remove dust spots?
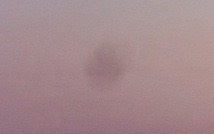
A dust spot magnified
You can’t send your camera back to the manufacturer every time you get a dust speck on your sensor. If you did, you’d pile up quite a freight bill and be without your camera for significant periods of time. And these days, those companies usually charge for the service, as well.
The first thing to try is the built-in camera cleaning ability (again: SETUP menu, Clean Image Sensor on most recent Nikon DSLRs). Some people do this wrong, by the way. The angle the body is held at is somewhat important: there are dust-catching strips below the bottom of the sensor in most cameras. If you hold the camera at anything other than near perpendicular, any dust the built-in function manages to dislodge may simply move to a place in the camera that lets it migrate back to the sensor.
Dust Off Reference Photos
While Nikon Capture NX-D software has the ability to use a "dust reference" shot to remove dust from NEFs and most Nikon DSLRs have the ability to take such shots, this often doesn't help you much.
The Capture Dust Off correction is done similar to cloning (i.e. copying neighboring data) but is done automatically by the software. One problem is that this can sometimes obscure fine detail (cloud tendrils). Nor does the Dust Off reference photo idea work well in the kinds of environments I shoot in, where the dust accumulation on my sensor changes daily (I'd have to take several reference photos a day and then carefully track them, adding yet more complexity to my already complex workflow). Finally, Nikon's software has an upper limit to the number of dust bunnies it can “erase” this way and I've encountered plenty of situations where I exceeded those limits.
So the Dust Off reference function in your Nikon DSLR isn't going to help you much. I personally suggest that you avoid using it: it produces too much extra work for too little potential gain.
Dust Avoidance
Okay, before we start willy-nilly cleaning our cameras, let’s talk about avoiding the problem in the first place. Here’s a question: how do you store your camera when it’s not in use?
Your answer should be “with the sensor perpendicular to gravity.” Sensor facing downward is also an acceptable answer.
If you store your camera on its back, gravity will absolutely bring some dust particles down onto the filter over the sensor. The longer your camera sits this way, the bigger the dust problem you’re going to have next time you want to use it.
Next, keep your camera out of dusty environments, whenever possible. Most of my gear sits in fairly air-tight cases when not in use. That doesn’t rule out dust getting on the sensor, but it’s only going to be dust that’s already in the camera and in the case. My office is in an area that gets a lot of blown-in dust most of the year, so if I left my cameras out, they’d be exposed to more dust. Thing is, dust is pernicious and can be quite small. Despite the weather casketing on many DSLR bodies, there are still plenty of ways it can work its way onto and into the camera.
A word of warning, though: if you’re in a high humidity environment, locking your camera in a mostly air-tight container can have other detrimental effects unless you put silica gel or other moisture removers in with the gear, and check/replace those regularly. I’d recommend an electronic dry cabinet [advertiser link] to store gear in high humidity environments.
What About Oil?
Due to the Nikon D600, you’ve probably heard about “oil on the sensor.” That camera had a reputation for shedding surface coatings from its mirror and shutter mechanisms, and throwing a lot of lubricant off the shutter, which made the problem worse.
First things first, it isn’t “oil”, it’s the lubricant used for the shutter and mirror mechanisms that sometimes creates droplets that hit the filter over the sensor. If you want 10 fps and 1/8000 shutter speeds, you’re going to want well-lubricated mechanisms ;~). Virtually all shutters have some lubricant to them. As do all mirror moving systems.
The early D600’s over-abundance of lubricant “splatter” really called attention to this problem, but frankly, all the DSLRs back to the original D1 have had this issue, at least minimally. Just not to the degree that the D600 does. It is not at all uncommon to discover after thousands of images that you have a few lubricant splatters on your sensor filter. That’s true of Canon, Nikon, Sony, and pretty much all ILC cameras, though there is some variability to how much this tends to happen.
Lubricant splatter looks different than dust. Where dust is a black or gray blob covering up to a few pixels, lubricant splatter looks like a circular water ring over a few pixels.
Here’s the thing: dust tends to be clinging to the sensor filter by tension and static charge, but lubricant splatter essentially bonds to the sensor filter. You can often shake, blow, or brush dust off the filter, but none of those methods work for lubricant splatter.
Should I Have Someone Else Clean my Sensor?
The answer to this is slightly complex. First, you should expect to pay for such services (though sometimes you can get one free cleaning from a camera maker or dealer as a courtesy, typically through manufacturer reps doing a promotion at a store here in the US). I’ve seen prices ranging from US$20 to US$50 for such cleanings. Depending upon who’s doing the cleaning and their schedule, you may be without your camera for awhile, too.
So when should you let “a professional” do a cleaning?
- If you’re really too timid to take matters into your own hands and don’t mind spending the money. But note, those costs are going to pile up over time.
- If you’ve attempted a wet cleaning but haven’t managed to get the sensor cleaned, or worse, made the situation worse.
- When it isn’t the sensor that’s dirty! If it’s the viewfinder that’s showing dust or dirt but those don’t appear on your images, it’s time to have your camera professionally cleaned.
- If your camera has sat unused for a long period of time.
Those of us who use our cameras for a living don’t encounter that last condition and we’ve learned (see below) how to do things right ourselves. Don’t get me wrong, as a member of Nikon Professional Services (NPS), any time I encounter the NPS crew at an event I’ll take up their offer to clean my sensor and do a quick check of my camera. If my local dealer is offering a free cleaning, I might take them up on it, too. But in general, I don’t have those luxuries every day, and I want my DSLR to be as free from crud sitting on the filter sensor as possible, so we get to the next step:
Do it Yourself Sensor Cleaning
If you shoot with your camera often, eventually you’ll come around to the decision most of us pros all have: that you’ve got to learn how to clean the sensor yourself. So let’s talk about that.
A reminder: you're not really cleaning the sensor, you're cleaning the anti-aliasing and IR block filter that sits just above the sensor. (On the Kodak DSLRs, this was just a very simple and thin IR block filter; on the D800E, it's a special partial AA filter that then undoes the partial AA, but it's still just a filter; on the D810 and D850 there’s no AA filter at all, but there’s still a UVIR blocking filter. I don’t know of any camera that doesn’t have some filter sitting over the sensor.)
First, don’t be put off by Nikon’s disclaimers (both Fujifilm and Kodak endorsed user cleaning that touches the filter for their Nikon-mount DSLRs if done properly). The Lithium Niobate filter over most Nikon sensors is somewhat difficult to scratch if you use the right tools and technique. On the MHOS Scale of Hardness table that ranges from talc at 0 to diamond at 10, Lithium Niobate is a 5, the same as Apatite, and a bit lower than Orthoclase and Quartz; Canon and Nikon don't reveal the material used in their current cameras, but it seems just as durable. Again, while it is certainly possible to scratch the filter surface, it's also not at all easy to do if you're using the right tools and technique.
Nikon (and others) also use filters that have a special additional coating on them (Indium Tin Oxide, or ITO for short). This coating is there to help the filter "shed" dust more easily (it essentially blocks some of the static charge that can build up and hold the dust). As with any coating, it is possible to damage, and when you do so, the filter essentially needs to be replaced.
When ITO coatings were first used, it was thought that an ITO-coated sensor was easier to damage with alcohol-based products than a non-ITO one. In theory, that's probably true, but in practice it doesn't appear to make any difference. Photographic Solutions dropped their special ITO-only cleaning fluid and now has gone back to methanol-based Eclipse as their primary sensor cleaning solution. Photographic Solutions honors their "no sensor damage" guarantee regardless of whether you clean a non-ITO or ITO filter with Eclipse.
While we're on the subject of coatings, I should mention that if you've had an infrared or other filter swapped in place of the regular filter, your cleaning methods may need to change. Those type of filters are made with different materials and coatings than the antialiasing filter that came with your camera. Thus, they may need different cleaning methods. I can't offer any specific advice here other than to consult the company that provided your filter to see what their cleaning recommendation is.
With that background information out of the way, it's time to look at the tools we use.
Cleaning Tools
What I recommended in the early 2000's became a much copied do-it-yourself approach to the tools for cleaning: use a Methanol solution with lint-free cloth wrapped around a flexible but stiff holder (my original was a filed down Wendy's knife, but I've used Rubbermaid spatulas and art supply tools from Michael's, as well).
Advances in available commercial products make the DIY tool approach no longer necessary. Today, I recommend three products (and you need them all): a common blower bulb, Sensor Swabs (with the correct type of fluid), and a Sensor Brush. Let's look at these in the logical order that you'd use them:
- Blower Bulb and built-in camera cleaning: Your first line of protection is getting the "loose" dust off the sensor. If your camera has a built-in sensor cleaning function (which vibrates the filter to dislodge dust), then use it regularly (on the Nikon cameras I suggest that you have your camera permanently set to Clean on Shutdown). If you have a camera with a built-in shake dust removal system you generally don't get much additional benefit from using a blower bulb all the time. Use the camera's built-in system regularly instead.
If your camera doesn't have a built-in shake-it-loose function, or that function doesn’t get the dust off, then you should have a blower bulb around to blow loose dust out. The most common blower bulb people use is the Giotto Rocket, though there are a wide variety of such blowers available. A good blower can be dislodge casual dust with a few quick puffs of air. A couple of pieces of advice: some cheap, generic blowers have a lubricating material in them that essentially turns into dust. Not good to be using that to blow on the sensor, as you just increase the amount of dust floating around to get attracted back to the sensor. Also, keep your blower bulb clean and well maintained. Throwing it into a dusty drawer and letting it get caked with other materials is going to come back to haunt you. Keep it in an air-free case and clean. I personally use a Giotto Rocket that has been modified by adding a Nikon body cap to hold its tip precisely and very close to the sensor (but not touching it). This makes the air stream very forceful at the filter due to the close distance to the filter. - Sensor Brush: Essentially a brush with extremely fine and soft bristles that has no coatings. You use compressed air (or a CO2 canister, a very strong foot pump, or the newer battery-powered spin-brush versions) to charge and clean the bristles. You must clean and charge the edge of the brush with air after every pass across the sensor. Light dust (in dry climates) is held onto the sensor by surface tension and static buildup, and what you're trying to do is break that bond and transfer the dust to another surface (the brush). Used correctly, a Sensor Brush works very well on most dust. Indeed, in a dusty, dry environment, it's usually the only additional cleaning tool I need, and I don’t need it very often with the recent Nikon DSLRs that have built-in sensor cleaning systems.
The biggest issue you face with this product is keeping your brush clean (the original Arctic Butterfly Sensor Brushes from Visible Dust come in a protective case; I'm not sure about the latest). The second biggest issue is that a sensor brush can't remove dust which is welded, nor can it remove lubricant splatter; but that's why you buy and use Sensor Swabs (see next).
Visible Dust makes several brush variants called the Arctic Butterfly that have an electric motor in them to spin the brush to charge and clean the bristles (that way you don't have to travel with or have access to compressed air). The original version had two flaws, the latest version has one. The fatal flaw in both is that the brush blade tends to widen as you use the spin cycle to clean it. This makes it more likely that the brush touches the sides of the chamber around the sensor filter, and some cameras have a greasy compound in those areas that you absolutely don't want to transfer to the brush. If you choose to use a Butterfly, be very careful about what the brush comes into contact with, or else you'll have an even more difficult cleaning chore to deal with some day. Personally, I like the original small Sensor Brush solution that Visible Dust sold better, but I realize that you can't always travel with canned air, which led Visible Dust to the motorized solution. - Sensor Swabs or Vswabs: These are a simple blade-like swab that you wet with a solution before swiping them across the filter to clean it (a few now come pre-wet). The original Sensor Swabs had a fatal flaw—the support mechanism behind the cleaning cloth was not reliable and allowed the edge of the cleaning surface to "break" (bend and reduce pressure, making it not clean well). Moreover, the support mechanism was relatively thick, and if damaged, could produce little plastic pieces that you had to clean up. No more. Photographic Solutions produced a new version that has a full, thin, plastic "blade" behind the cleaning material. Indeed, they keep improving their basic swab design, and the latest version (the Ultra) is quite good. It's now possible to maintain even pressure across the edge without it collapsing, even when very wet. The blade itself is a very soft plastic and can't really be forced hard enough to damage a sensor or filter surface. Visible Dust has a similar swab product, called the Vswab.
You can usually find swabs in at least three sizes. In Photographic Solutions Sensor Swab terminology, the Type 3 is 24mm (FX/full frame), the Type 2 is 17mm (DX/APS-C), and the Type 1 is 20mm. In Visible Dust terms, all DX/APS-C cameras should use their 16mm swab, all FX/full frame cameras should use their 24mm swab. You can also get pre-moistened Sensor Swabs (more expensive, but very travel friendly). Note: many Sensor Swab imitations have appeared. Essentially they're all plastic support mechanisms with a lint-free cloth of some sort wrapped over it. While most of those others appear to work fine, I've simply never had a problem with Sensor Swabs, and Photographic Solutions continues to improve them based upon photographer feedback, so I continue to recommend them. (You can see a large selection of available swabs at this site’s exclusive advertiser, B&H [advertiser link])
While you can't quite put as much pressure on the edge of pre-made swabs as with some homemade tools, that's a good thing in most ways, as it makes it less likely you’ll apply too much pressure and scratch the sensor. Another plus is that pre-made swabs are made in a clean-room environment and come in sealed packs. Thus, they're ready to go on demand and you won't be having to worry about keeping your cleaning materials clean and dust free until you need them, as we used to have to do with home-grown support mechanisms. Yes, pre-made swabs are on the pricey side (US$3 each is typical), but you won't be using a lot of them.
Basically, you only use a Sensor Swab when you have a persistent dust particle that isn't removed by blowing, in-camera shake-off, or brush, you have lubricant splatter, or you have what I call welded dust.
And Now the Cleaning 101 Play-by-Play
So here's the full cleaning regimen:
- Regularly use the built-in dust cleaning mechanism of your camera, if it has one. About once every shooting session and after any long period of disuse should be fine. Remember to hold the camera normally (sensor perpendicular to the ground) so that the dust falls to the adhesive strip at the bottom of the sensor chamber designed to catch the dust. Skip to Step 3.
- (For those without a built-in shake dust removal system) On a regular basis, use your blower bulb to try to dislodge casual dust from the filter surface (camera should be facing down so that dust dislodged falls out of the camera through the lens mount). Do this in a clean environment and regularly, and you generally will get most of the dust dislodged this way without having to touch the filter.
- Use a Sensor Brush whenever you need to remove casual dust that the automated cleaning or blower bulb can't dislodge. Follow the Visible Dust procedures exactly; don't take shortcuts. Most of the time, this is enough cleaning to remove the offending dust. Be extremely careful not to touch it to the sides of the sensor mounting frame with the brush.
- Take a picture of a plain sky or white wall with a small aperture and examine it closely (at pixel view level). If you only see small black blobs, skip to the next step. If you see black blobs surrounded by a circle or you see small semi-transparent circles, you've got welded dust (dust adhered to the sensor because humidity locked it on), pollens, or lubricant (thrown from the shutter). These almost always require a "pre-wash" step. For that “pre-wash”, use a fluid that's more designed for this type of problem (e.g. Visible Dust's Smear Away) with a Sensor Swab. You may have to wet the swab a bit more than usual, and it might take multiple passes to get stubborn lubricant or pollens off the sensor. Don't worry about streaks. Your primary goal is to get those small circles removed. After this step, let the camera sit for a long period so that the sensor surface dries completely.
- If you still have dust (skipped here from Step 3) or you have streaks from cleaning (Step 4), use a Sensor Swab wet with Eclipse, Aeroeclipse, or Dust Aid Ultra Clean solution. Again, follow those companies' procedures exactly.
- If you still have a persistent dust bunny or oil spot, go back to Step 4. You may need to use a wetter swabs(being careful not to wet it so much that the cleaning material breaks) when you go over a spot again, perhaps with a gentle scrubbing action (and I mean gentle, and only with a brand-new clean swab). One thing to be wary of: don’t wet your swabs so much that they leak fluid; on some cameras the fluid can get to the edge of the filter and wrap around underneath it. So don’t go overboard with wetting.
- If you get to this step and still have problems, it’s time for a professional cleaning. If the problem is really persistent, you’re probably best off sending the camera to the manufacturer or an authorized repair shop, as they may have to disassemble some to get direct access to the full filter to clean it.
Things That Go Wrong
By the way, it’ll probably take you a few tries with Sensor Swabs to get it right the first time you try to clean your sensor by yourself. The usual mistakes I see from first-timers are:
- Too much liquid is used, and a streak is left behind. One or two drops is all that is needed most of the time. Follow the instructions that come with the fluid you use and don't overload the tip of the swab.
- You don’t start beyond one edge of the sensor's imaging area and swipe past the other edge, leaving dust at both edges. Make sure to start just off the imaging area and continue your sweep with the swab until you're off the imaging area on the other side. This is difficult to do on some cameras, as the camera makers sometimes leave too little space to do that.
- Swiping too gingerly, which tends to leave behind a few stubborn spots (and may even make them more stubborn as they've now been wet and start to act more like welded dust). Exert a moderate and continuous pressure as you sweep. But don't use lots of force.
- Not holding the support close to perpendicular to the filter (I use a very slight tilt towards the side I'm moving towards), or lifting before you get to the side and leaving dust on the filter on that side. You may have to lean the swab at the very start and end of your sweep in order to avoid touching the sides of the sensor chamber, but through the main portion of your sweep the swab should be nearly upright.
- Trying to “rub” the filter clean you tend to just move the dust around. Once it is on the lint-free cloth, it can migrate back to the sensor filter if you use improper technique, such as too much or not enough fluid, or rubbing motions. Moreover, if you "rub" a really hard particle across the filter you can scratch it. Don't rub, sweep! The one exception to this is if you need to do a pass on a particularly tough spot, like oil. Then you may need to do a small bit of "wet scrubbing" to get enough pressure on the item to remove itself. The only time you can scrub is with a very wet, clean swab. Still, be very, very careful about this: too much pressure can damage the sensor filter and cause a costly repair.
- Doing the cleaning in an environment where there is lots of dust in the air! Pick the room that has the least likelihood of particles being in the air. A dusty office with carpeting is not as a good as a clean kitchen, for example.
Additional Tips
Here's a couple of added tips for cleaning:
- Get a headlamp. The Petzl LED headlamps work great, though you look like a geek using one to clean your camera. Using a headlamp lets you put light right where you need it, and even makes it easier to see the largest dust bunnies.
- Minimize the time. I try to keep the amount of time my sensor is exposed to light, especially bright light, to a minimum. That's not to scare you into thinking that if you leave your sensor exposed for five minutes that it'll produce poor color next time you use it; just that light accumulation to the Bayer layer really should be minimized whenever you can. If you clean in a darkish environment using an LED headlamp and don't take more than a few minutes, don't worry about it. But don't leave the camera's shutter open while you walk around the house or office looking for your cleaning supplies, decide to have lunch, watch a football game, and then come back and clean your camera! (Besides, the longer you leave the shutter mechanism open, the more dust gets into the box that you'll eventually have to clean out.)
- Don't worry if you can't see it. A photosite on most DSLR bodies is between 30 and 64 square microns. You could fit several hundred photosites onto this em dash: —. Thus, a dirt particle that covers a photosite or two can be very small—essentially invisible to the naked eye. That's just one reason why I discourage use of products like the Speckgrabber to clean sensors—you can only see the really big stuff, so where would you know where to use the Speckgrabber on dust? Moreover, Speckgrabbers don’t work for lubricant splatter. (Speck grabbers can be useful in pulling things out from the opening above the autofocus sensors on DSLRs, though.)
Since I first wrote this article we've had so-called "sensor microscopes" introduced that you place in your lens mount with the camera set to the sensor clean mode. These LED-lighted devices have modest power magnification that allows you to closely examine the sensor surface. The Delkin version is less clear than the Visible Dust version, but neither are exactly great at helping you see the really small dust.
They are, however, good for checking for streaks after cleaning, for locating the position of larger dust particles and hairs, and for seeing some exotic larger problems (like wet pollens adhering to the sensor filter surface). Personally, I don't find them worth purchasing: just do a regular, thorough cleaning and don't get anal about examining it! Besides, the longer you leave that shutter open, the more that dust in the air—and there will be dust in your air—will wind its way into the sensor area, and eventually onto the sensor.
Plenty of other sensor cleaning products have made it to market. I've looked at almost every one of them. None to date have prompted me to change my basic instructions: (1) use the in-camera system; (2) blow it off; (3) brush it off; and (4) wet clean it with a proper liquid and swab.
In particular, the “sticky pad” type of cleaning is one I don’t like at all. These tend to be sticks with a square or rectangular pad at the end that’s treated with material/solution that attempt a glue-like grab of whatever is on the sensor filter. My experience with them has been that they tend to make the filter itself stickier over time. This, of course, means you get future dust that adheres better. But the thing that makes me not recommend them is that I’ve found that doing a wet cleaning after using these sticky pads is more problematic. Whatever light residue that those pads sometimes leave behind just makes it tougher to do good regular wet cleaning later. And remember, you may have to do that if you get oil splatter on the sensor. The sticky pads won’t remove oil spots.
What if Things Go Wrong?
Finally, the question that sometimes comes up: what do you do if you actually damage your camera during cleaning?
First, make sure you've actually damaged it. I've had a number of people show me cameras they thought had damaged filters from cleaning that simply turned out to be either very persistent particles (in one case, a very sticky pollen), or simply had residue left behind due to a botched cleaning not using recommended materials. If you live near your camera maker's repair center, you can ask them to clean the sensor (most of the time they'll charge for that). But if they hand you back the camera and say that you do have a damaged filter, then your choices are these:
- Go topless. Have someone remove the filter. You'll actually get “sharper" images this way, but on most bodies you'll then need to shoot with a hot mirror filter to avoid near IR pollution in colors, and you should put a piece of optical glass the same thickness as the original filter over the sensor. MaxMax can do this for you or sell you what you need.
- Head up-spectrum. Ever wanted an near-IR capable camera? Well, in the process of converting those cameras, they remove the regular filter and replace it with a near-IR filter. Thus, your problem filter is no longer a problem. I recommend LifePixel and MaxMax for IR conversions.
- Replace and learn. You haven't actually damaged your sensor, which is usually the most expensive part in your camera. You've damaged the filter that sits on top of the sensor. The bad news is that disassembling the camera to replace the filter is not a 10-minute job, and requires someone who knows what they're doing. That means the camera maker, an Authorized Repair Center, LifePixel, or LDP here in the US. And it means a healthy cost because of all that hand work. I’ve seen charges for filter replacement range up to US$800.
Support this site by purchasing Thom’s recommended cleaning supplies from this advertiser: