Infrared is a spectrum of light beyond that which we normally see. Despite having an IR blocking filter installed between the lens and the image sensor, most digital cameras still react to some near infrared energy, though at levels far lower than visible light. To take “infrared” pictures—i.e., photos primarily made up mostly of the near infrared energy—you need to filter out the visible light and only allow the near infrared and infrared spectrum through to the sensor. The easiest way to do this is to use a Wratten filter, which you can find at most professional camera shops.
The Wratten series (and other dedicated "infrared filters" [misnamed because they don't actually filter infrared]) are very dense filters, nearly opaque. Because they block most or all of the visible light, you’ll need very long exposures, so you’ll want to use a tripod.
Technically, we're talking about near infrared, the spectrum in the 700 to 900 nm range, but pretty much everyone shortens that to infrared.
Generally you should set your digital camera to B&W (monochrome) mode if it has one, as infrared filters remove most of the usable color information (it is amusing to bring a color infrared image into Photoshop and run Auto Levels on it, however). This best mimics the old style B&W infrared films that were used last century. Also, note that incandescent lamps don’t put out much near infrared (heat is thermal energy, not infrared light), so you’ll probably want to start your experiments with daylight landscapes. During the day there is plenty of near infrared available to record images with.
If you don't set B&W (monochrome) mode, how much color you get and what color it will be is mostly determined by the filtration you use. The higher the visible light cutoff you use, the more dramatic the color loss/change. A good starting point would be a 720 nm cutoff, but you can get lower and higher.
One problem you’ll discover, though, is that once you filter all the visible light, exposure times will be quite long. On my D1x, which allowed a fair amount of near IR to pass normally, I found my exposures are often measured at five seconds or longer. On my D4 Nikon has tightened the IR filtering significantly and my exposure times will stretch to 30 seconds, maybe more, depending upon what filter I'm using and the actual amount of light in the scene.
This brings out an important issue: some cameras work better for near infrared photography than others. In general, the newer your Nikon DSLR is, the less likely it is suited to near infrared work; Nikon keeps tweaking the filter over the sensor to bar more and more near infrared, which extends exposures longer and longer with external filters.
The best solution is to have a camera converted to near infrared only, which we'll get to in a bit. Many of us just keep older D100 bodies around because it is probably the best suited camera to external filter infrared work.
Here’s one set of steps to try:
- Focus. Once the filter is on, you won't be seeing much of anything until after the exposure, so focus is your first priority. Infrared light focuses at a slightly different point than visible light, so make sure that you use an aperture in Step 6 that has a decent depth of field. If your lens is one of those that has an infrared focus mark on it, first focus normally, then adjust to that mark.
- Place the infrared filter in front of the lens.
- Set the camera to manual exposure mode. I've found that the meter in most Nikon cameras, at best, does only a fair job of infrared exposures. Personally, I almost always have to set exposure manually to get the proper exposure, and that often involves trial and error.
- Set the camera to shoot B&W only. Optionally, you can perform this step later; but it's easier to evaluate exposure with the camera set to B&W if that's how you'll print the image. (Note that if you shoot raw, you'll still have the color information—only the preview image is generated in black and white.)
- Set the camera to a higher ISO rating than usual. I usually set ISO 400 on my D1x, even higher on newer models. You'll be balancing ISO-generated noise with long shutter speed generated noise. With recent cameras, you should set Long Exposure Noise Reduction to reduce hot pixels.
- Set the exposure. Take a test exposure and examine the histogram. Since you're usually printing the final image in black and white you'll need a wide histogram that ranges from nearly pure blacks to nearly pure whites. Be careful at the bright end, however—foliage has a tendency to go absolute white in infrared, and you must retain enough working room to keep detail (e.g., don't let the histogram extend off the right side!). Adjust your exposure until you've got the broadest, workable histogram.
- Confirm focus. If you've got a camera with Live View, it's a good idea to confirm that focus is where you want it to be.
- Take your shot!
DSLR users have a wide choice of dedicated infrared filters, in a range of sizes. I've tried a number, but I like the Hoya 72 best on a non-converted camera. Generally, the number in the filter name is an indication of the cutoff point for visible light—in this case, 720 nanometers, which is decidedly in the top of the visible red range. The higher the cutoff, the more the filter ignores visible light. B&W, Tiffen, and Hoya all make several infrared filter variants in most lens filter thread thread sizes. While pricey, these are high quality filters that will last you a lifetime. Each DSLR model has a bit of a different sensitivity in the near infrared, but don't worry too much about trying to match a filter to your camera.
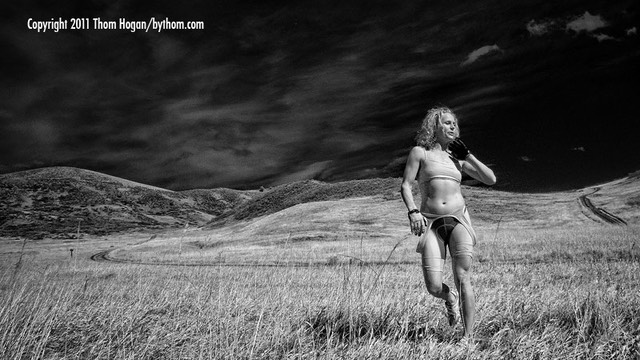
But if you really want to shoot infrared regularly, you should just have the infrared blocking filter removed on a camera and replaced with a visible light blocking filter. The picture at the top of this page was made with a converted Canon G11. Of course, you can't continue to shoot normally with that camera, once converted (you'd need an IR block filter and probably a UV block, too, depending upon the model). But a used camera can be picked up inexpensively, making this a reasonably low-cost venture. What I tend to do is keep one of the cameras I replace with upgraded models to convert to infrared. Typically conversion costs would run you another US$200-400. Some conversions run more money because of the complexity of the tear down necessary to get to the filter over the image sensor.
I've had cameras converted by two vendors, MaxMax and LifePixel. I can recommend both. They both convert different sets of cameras, but both convert most Nikons.
Midway through the first decade of the century Fujifilm gave us another option in the US. First, they introduced the S3 Pro UVIR, an S3 Pro without any color filtration over the sensor at all (the sensor Fujifilm used had a very wide spectral response, from low ultraviolet to high near infrared). Then they introduced essentially the same thing for the S5 Pro body. To take "normal" pictures with those cameras, you have to use filtration that takes out both UV and IR, but not the visible spectrum, typically called a UVIR filter. But by varying the filtration, you can take UV, visible light, or IR photos. Forensic evidence technicians like that kind of flexibility, which is who those cameras were targeted for. Several kits, including filters were available, but the cost was substantially more than just an S5 Pro body by itself. Still, a serious UV/IR shooter would welcome the flexibility (and capability) of those cameras if they could find one on the used market. Fujifilm also offered a couple of "consumer" UVIR compact cameras, too.
Still, the best approach for someone who wants to shoot IR on a regular basis is to take a competent compact camera and have it converted. I've published several pictures on this site from my Canon G11 converted this way: you can get remarkably good results from some of the better small cameras. (The thing you have watch for is whether the lens on a compact camera is suitable, as some produce a visible hot spot in the middle of the frame; the conversion services can help you figure that out.)
Once you’ve taken an infrared shot, you’ll probably want to manipulate it a bit to make it better emulate the look of infrared film, which has unusual "color" (white foliage, for example) and a bit of graininess and bloom to edges. With Photoshop, try the following:
- Remove the color, if any. If you’re working with a color image, select Desaturate from the Adjust submenu on the Image menu. Alternatively, you can also choose Grayscale from the Mode submenu on the Image menu, but this doesn't generate the best results. Other ways to make a black and white image from a color exist within Photoshop, as well, but I usually start by looking at Desaturate reveals.
- Balance the image levels. The picture directly from your camera may look strange, as, despite your exposure efforts, it may still have most of the image data all bunched up at one or both ends of brightness range. Novices: select Auto Levels from the Adjust submenu on the Image menu. If you’re an advanced Photoshop user and want to preserve image data and get finer control, select Curves instead of Auto Levels, and adjust manually.
- Sharpen the edges. The results so far will probably appear somewhat softer than usual, so select Unsharp Mask from the Filter menu. Try starting at values of 100 for Amount, 2 for Radius, and 1 for Threshold, and then tweak as desired. Better still: use the Smart-Edge technique I describe in my Sharpening article.
- Make it look grainy. Traditional infrared film is sharp, but grainy. To add grain, choose Add Noise from the Noise submenu on the Filter menu. Start with values of 20% and Uniform and tweak as desired. Alternatively, select Grain from the Texture submenu on the Filter menu. Start with values of Soft, 15% Intensity, and 50% Contrast and tweak as desired.
- Add edge glow. Traditional black and white film tends to have an unnatural glow around edges, especially bright ones. Select Diffuse Glow from the Distort submenu on the Filter menu. Start with values of 6 for Graininess, 5 for Glow Amount, and 20 for Clear Amount.
Tip: Try these Photoshop steps with a regular, non-infrared image. You might be surprised by the results!
Lens Issues
One thing that you may find is that you get a central hot spot in the frame when you shoot with a truly IR-enabled camera. Typically, this has to do with lens coatings, though there are other factors that can be involved, including where the aperture is located. Some lens coatings just don’t pass near IR the same as others, some reflect near IR scatter back towards the sensor.
Nikkor primes that seem to do okay tend to group in the older lens category: 14mm f/2.8, 18mm f/3.5 AIS, 20mm f/2.8, 24mm f/3.5 PC-E, and the 50mm pre-G lenses. Nikkor zooms that do well also tend to be older. For DX shooters, the 16-85mm is a top choice, though the original 18-55mm seems fine, too. For FX shooters the 14-24mm, 18-35mm, and the older 28-70mm or 35-70mm are the best options I’ve found.